Parts of a Knife: What Makes a Survival Knife?
Before discussing the parts of a knife we must first discuss what type of knife we are discussing. As with most things that people prize, collect, and use, almost everything about knives is up for discussion and often disagreement. So if we say, for example, that “a knife that folds is not good for a survival knife” probably ninety percent of knife experts would agree, but there will always be those who dispute it.
They might say that if a folding knife is all you’ve got in an emergency, then it’s a survival knife. True under such circumstances, but it’s not the general way to describe a survival knife. As you’ll see, survival knives are about versatility but in a different way than a Swiss Army knife or a multi-tool. Survival knives are about versatility and strength; being able to do jobs that require a lot of force, for example, chopping wood.
It’s fair to say there is no simple description of a survival knife. Its blade and overall length is variable. The shape of the blade can vary, as can the steel and blade characteristics.
Most people would agree that a survival knife is relatively large, in the range of 8-14 inches in total length, with a blade of 4 – 10 inches; has a fairly thick blade (for strength), and is built for utility rather than looks or inherent value. We’ll look at some of these points of agreement in detail throughout the Survival Knives 101 articles.
Parts of a Knife:
Although terminology can get out of hand, it’ll help to make a quick mental picture of a ‘standard survival knife’ (a slightly fictitious concept) and its associated parts.

The parts of a knife ( survival knife) are the same as most fixed blade knives. Essentially, all knives have two parts, a blade and a handle. Of course, it’s the details that count. You’ll see illustrations of the parts of a knife all over the internet and the differences in terminology may be confusing.
For example, a bolster is usually a protrusion of metal between the blade and handle that protects the hand. Sometimes there are two bolsters, front by the blade and rear at the butt. However, if there are two at the blade in a cross formation, they are called a quillon or crossguard. Some diagrams simply identify anything protecting the hand as a guard.
Fortunately, for everyday use of a survival knife you don’t need to know the fine points of knife nomenclature, but in order to handle and maintain the knife you should instantly recognize these parts of a knife: point, blade, edge, spine, guard, handle, and butt (or pommel).
Obviously, the blade is the most important part of a knife, which we cover in four Survivor Knife 101 articles. This article covers the other parts, which are also important to the overall quality and use of the knife.
Parts of a Knife: The Tang
There is one very important part of a survival knife, which needs a separate illustration – the tang.
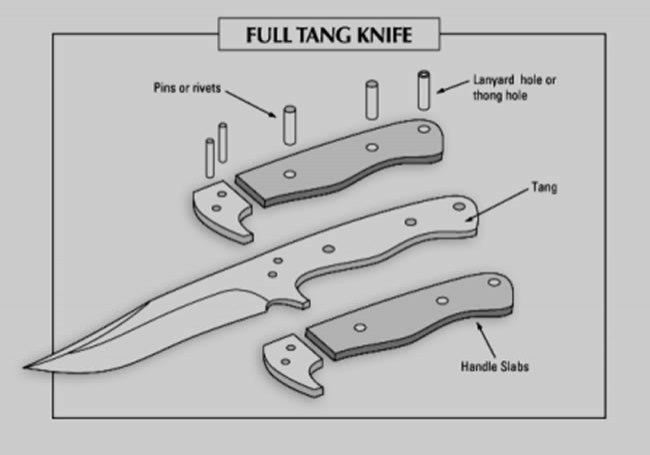
The tang is the part of the blade inside the handle. If there is any unanimity of opinion about survival knives, they should have a full tang, one piece of steel for blade and tang, roughly the same width and thickness, extending to the butt of the handle – in other words, one piece of steel all the way through the knife. More than anything, this illustrates the essence of a survival knife – the emphasis on strength and durability.
While full tang may be intrinsic to a survival knife, how the handle incorporates the tang varies. There are several tang styles.
Scaled – The handle has two pieces fastened to each side of the tang with rivets.
Encapsulated – The handle is molded around the tang.
Extended – The tang extends beyond the handle at the butt, usually functioning as a hammer surface.
Stick – The tang is much narrower than the blade to cut weight.
Hidden – The rivets and edges of the tang are hidden.
Skeletonized – The tang metal is hollowed out, to cut weight and often to make a storage compartment.
Tapered – The tang is tapered from blade to butt to gradually reduce the size, thickness, and weight.
Push – The tang is inserted (pushed) into the handle and then fastened.
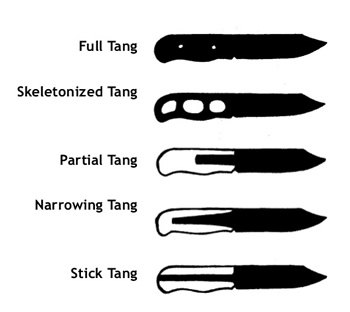
Several of the tang styles (stick, skeletonized, tapered) deliberately cut tang metal to reduce weight. If done properly these styles can retain strength and durability but are usually not recommended for survival knives. Knives used for quick manipulation with the hand, such as for skinning or fighting generally are lighter in weight.
Utility knives, such as the survival knife, will more often feature a heft that feels solid and strong. Still, the weight and feel of a knife is mostly a matter of personal preference, as long as the inherent strength of the knife isn’t compromised.
The tang style isn’t always apparent on some knives. Many manufacturers also don’t describe it in their literature. You need to trust the manufacturers of reduced and skeletonized tangs that cutting away tang metal hasn’t affected the ability of the knife to take leverage and torsion.
Another point, full tangs that expose the metal at the butt, especially those that flatten out into a pommel, are particularly good for hammering and batoning techniques.
Parts of a Knife: The Handle
For practical purposes, there are three vital things about a survival knife handle: It must stay attached to the tang; it must be durable, and above all, it should feel comfortable to use. Determining these things when you buy a knife is difficult; mostly they require a lot of field experience.
Other than that, you have to rely on manufacturer reputation, knowledge of the materials and your own sense of the handle. Fit and feel are highly subjective, but you can get a decent impression on the first opportunity to handle the knife.
The style of the tang (see above) may determine something about the design of the handle, especially with a full tang where the metal is usually exposed. However, manufacturers have found innumerable ways to shape, fit and attach handles – sometimes concealing tang types, sometimes not.
Likewise, the material of the handle comes in every type, synthetic and natural, including Kratan (synthetic rubber), molded plastic, leather, nylon polymer, hytrel, polyester elastomer, nylon resins, epoxy resins, or even the bare tang. Keep in mind the handle should also feel right when wet, covered in sweat, iced over, or dirty.
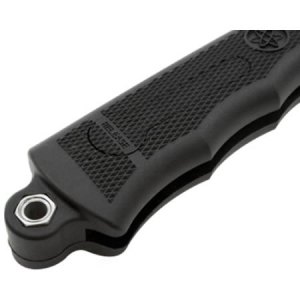
Some handles have a pre-drilled hole near the butt in order to attach a lanyard. Whether a lanyard is appropriate depends on use of the knife and the environment. For example, any environment where dropping the knife risks permanent loss, such as the sea or in the high mountains, having a lanyard around the wrist is good insurance. Other times, a lanyard is just some dangling thing to get entangled.
Bolster, Quillon or Guard
These three parts of a knife: bolster, quillon and guard are difficult to categorize because sometimes they’re part of the handle, sometimes part of the blade or tang, and sometimes they’re not part of the knife at all. Regardless, they all do about the same thing – protect the hand, either from slipping off the handle (possibly onto the blade), or from being struck by something else (like an opponent’s blade).
As mentioned earlier, bolsters are protrusions of metal that more or less cradle the hand, either at the point where the handle meets the blade or at the butt of the knife. If they’re long enough, the bolsters also act as guards, protecting the hand from being struck.
When there are guards on both edges of the knife at the handle, each is called a quillon (kwil’ en). Manufacturers and reference works often substitute guard, bolster and quillon, which make it difficult to arrive at a precise definition, but really, the fact is most knives, including survival knives, try to cradle and protect the hand.

Pommel
In some descriptions, the pommel is the same as the butt of the knife. Most of the time, the butt is the generic name for the end of the handle, while a pommel is a specific piece – either part of the tang or an end cap – that reinforces the butt so it can be used for striking or hammering. In survival knives, a pommel is common, as it adds the ‘hammer’ functionality, even if it is limited.
Sheath
Unfortunately, for many knife manufacturers, even reputable ones, the sheath is an afterthought. It’s unfortunate because the sheath is important. It protects both you and the knife from damage. It determines how quickly you can draw the knife – or not. It, hopefully, prevents the knife from falling out.
There are many types of sheaths, different in materials, attachment capability (MOLLE), body position and storage capability. Many of them are not well designed, or at best, minimal in quality or not appropriate for the way you intend to use the knife.
Fortunately, you are not stuck with a sheath. If you don’t like the one that comes with the knife, then you can select your own. Of course, you pay for it and finding just the right sheath to fit the knife may not be easy.
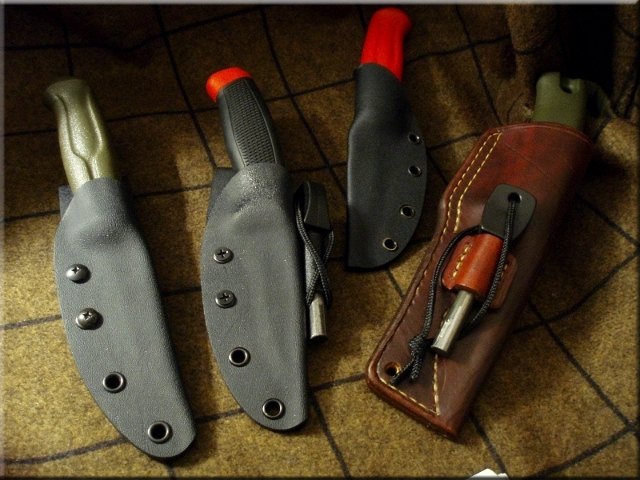
Because a survival knife is on the relatively big side (it’s certainly not made for pockets) and intended for routine use (meaning it should be quickly accessible), it pretty much has to have a sheath. It’s up to you where to mount it – hip, belt, shoulder, chest, thigh – although most supplied sheaths are belt or hip mounted.
Whatever your preferred position, make sure the sheath comes with or can be fitted with appropriate strapping to keep the knife in the sheath and keep the sheath in position on your body. You may even want a ‘quick draw string,’ one that holds the end of the sheath down to allow unhindered removal or replacement of the knife – much like gun holsters had for western gunfighters.
It’s also your choice in material. Many people prefer the look and feel of leather, which is traditional and functional. Leather works less well in wet climates or marine environments as it can promote rust. Modern materials such as Kydex or Zytel don’t absorb water. They’re also inexpensive, which causes some folks to turn up their nose at them despite the fact that they are tough and don’t become brittle in subzero temperatures.
Some sheaths are designed with additional storage space to hold a sharpening tool and knife oil. This is a very practical approach, as long as the space isn’t in the way.
Continue Tutorial Below
Read More
Read More
Read More
Read More
Read More
Read More

